Working with git repositories
Here are some useful notes on git.
Setup SSH key access to your github account
This step allows you access the repos hosted on gitgub without any password. These are the steps to do it on Mac/Linux. On Linux you need to have the SSH packages installed.
First, check if you already have any keys, if you do, they are located in your ~/.ssh directory:
$ ls -al ~/.ssh
You can find your public SSH key under any of these file names:
- id_dsa.pub
- id_ecdsa.pub
- id_ed25519.pub
- id_rsa.pub
If you don't have any key file, you can generate one using the following command:
$ ssh-keygen -t dsa -C "your_email@example.com"
This command will ask for a path for the SSH key file and a passphrase. Leave the defauls, path: ~/.ssh/id_dsa and empty passphrase.
Now, open your public SSH key file and copy the content. Alternatively, you can copy directly from the command line using:
$ pbcopy < ~/.ssh/id_dsa.pub
Now, go to your github account and add it under Settings > SSH Keys:
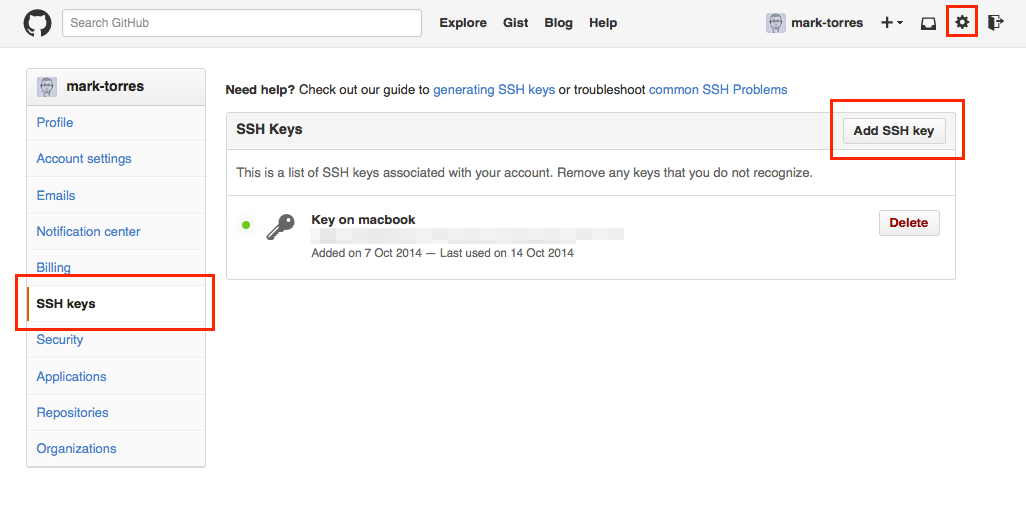
- Click on the Settings icon on the top right of the page.
- Click on SSH Keys on the left menu.
- Click on Add SSH key and paste the content of the file.
Finally, check the ssh access to your github account:
$ ssh -T git@github.com
This asks if you want to add the host to your list of known hosts, type yes and hit enter.
The authenticity of host 'github.com (207.97.227.239)' can't be established.
RSA key fingerprint is 16:27:ac:a5:76:28:2d:36:63:1b:56:4d:eb:df:a6:48.
Are you sure you want to continue connecting (yes/no)? yes
You should get a message like this:
Hi username! You've successfully authenticated, but GitHub does not
provide shell access.
Git Installation
Before you start using git, you must install it on your server or your local machine.
Local installation
To select your git installation package, go to the Git download page and look for the specific install instructions, depending on your operating system.
Optionally, you can check out the GUI clients for git in case you don't want to work on the terminal.
After you install on Mac/Linux, you should be able to use any git command.
Now, you can personanize your global git configuration by adding your name and email.
$ git config --global user.name "Your Name"
$ git config --global user.email "your@email.com"
If you need to set different configuration per project, you can navigate to your repo
directory and type the same commands, just ommit the --global option.
Optional terminal tweaks (Linux/Mac)
After you install git, you can optionally customize your terminal to show specific git info, like your current branch or add git autocompletion.
To do so, open a new terminal window and do the following:
$ cd ~
$ curl -OL https://github.com/git/git/raw/master/contrib/completion/git-completion.bash
$ mv git-completion.bash .git-completion.bash
$ curl -OL https://github.com/git/git/raw/master/contrib/completion/git-prompt.sh
$ mv git-prompt.sh .git-prompt.sh
Edit your .bashrc or .bash_profile and add this lines:
# git promt
if [ -f ~/.git-prompt.sh ]; then
    source ~/.git-prompt.sh
    export PS1='[\u@\h:\W$(__git_ps1 "(%s)")]\$ '
fi

# load git autocompletion
if [ -f ~/.git-completion.bash ]; then
    source ~/.git-completion.bash
fi
In some distributions, you will have to edit the file .profile instead, or add the following line to it:
source ~/.bashrc
Clone github repo to work locally (command line)
After you add your SSH key to your github account, you can clone and work on any repo without needing any password.
To make a local copy of a repository, use the 'clone' command and the SSH URL of the repository:
$ git clone git@github.com:your/repo.git /local/folder
The /local/folder can be an existing directory, but in case it doesn't exist
git will try to create it.
This command creates only a master branch for you to work on it. If you need to track another remote branch, you can use the following command:
$ git checkout --track origin/remote-branch
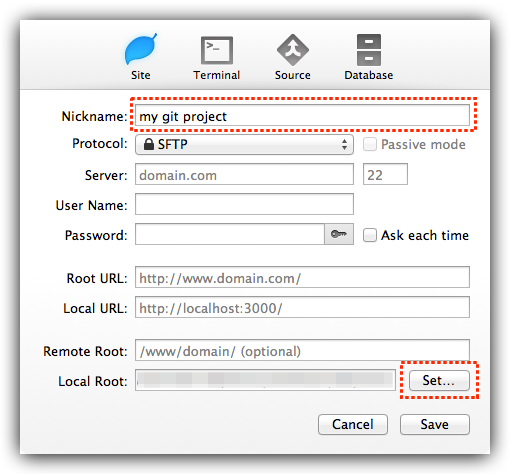
Clone git repo using Coda 2
Open Coda 2 and add a new site, set the site nickname and the local root folder:
Then, switch to the source tab and click the Clone Git Repository button:

Enter the ssh repo URL and you password, wait a little and you are done.
This creates only the remote master branch on your local copy. If you need to track additional remote branches, you have to add them manually via console command:
$ git checkout --track origin/remote-branch
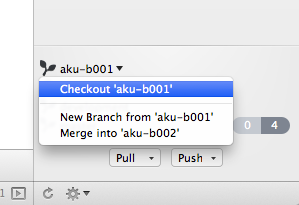
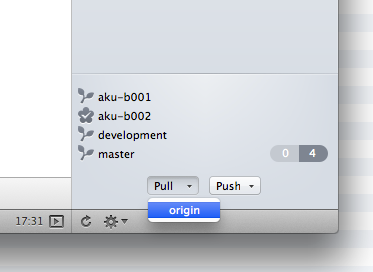
To see the SCM options, you can click on the Home button and then the SCM icon:
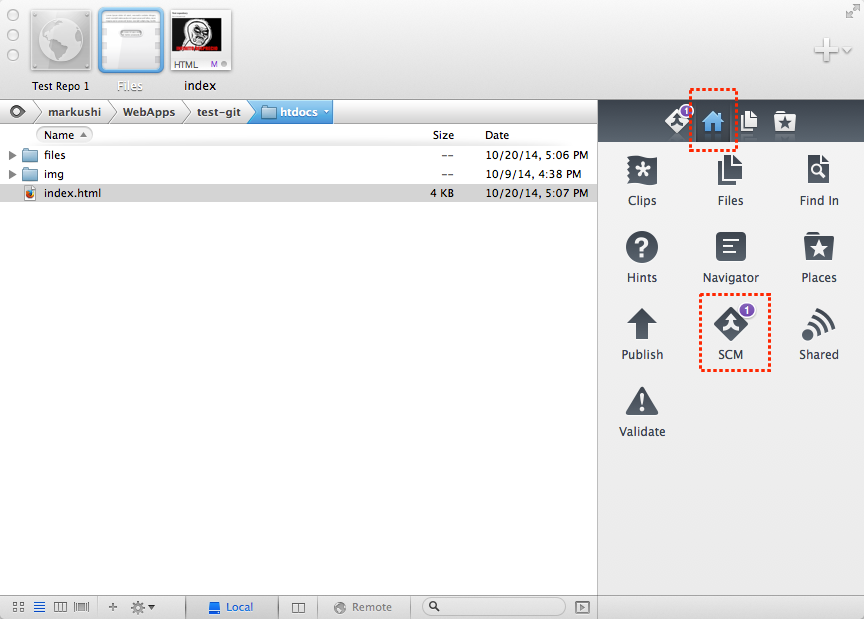
The SCM panel shows the branches on your git repo and shows you the list of modified files and actions like Add and Commit.
Some more options:
| Branch options | Pull/push options |
|---|---|
 |
 |
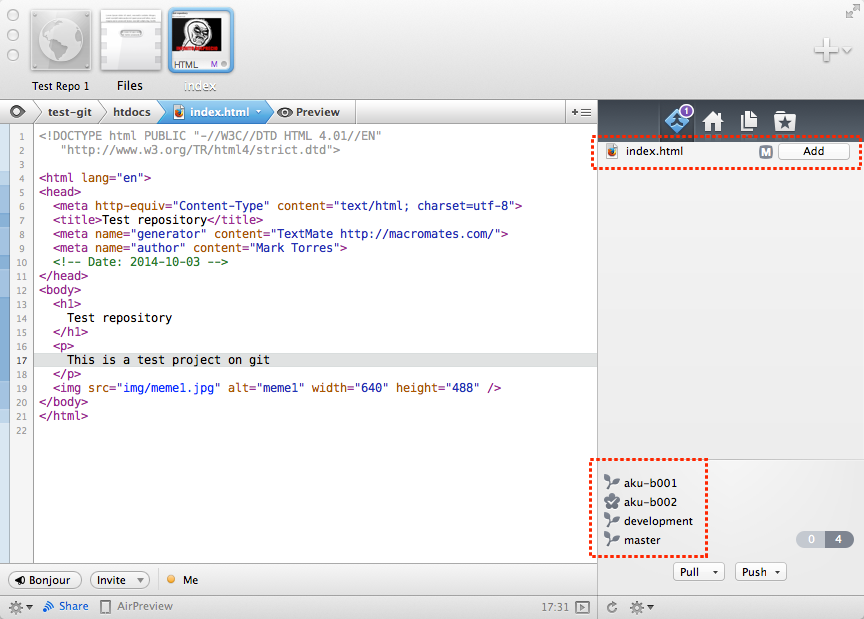
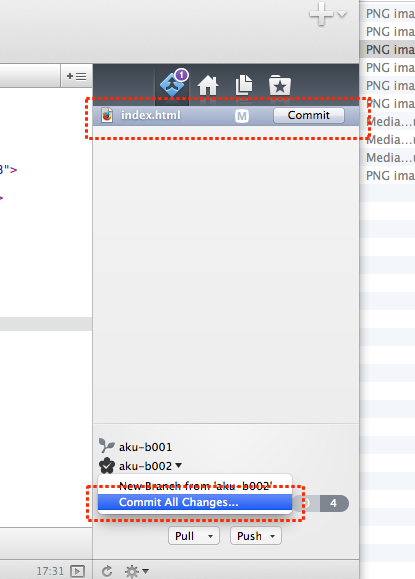
After you add a file, you can commit the changes with the button on the right of the file or if there are several changes, you can use the Commit All Changes option from the branch menu:
Deploy project using git PUSH and git hooks
On the server, go to the folder you want to deploy your project into and initialize a new repo. This new repository must allow to receive changes on the current branch.
It is recommended to make sure the .git folder is not visible to the web server. So, the project should include the document root folder for the vhost.
# cd /srv/vhosts/staging.my-project.com
# git init
# git config receive.denycurrentbranch "ignore"
Now, activate the post-update hook by renaming the sample script in the hooks folder
# cd staging.my-project.com/.git/hooks
# mv post-update.sample post-update
Then, add the code to run when an update is performed. The file should look like this:
#!/bin/sh
git update-server-info
cd ..
GIT_DIR='.git'
umask 002 && git reset --hard
Make sure the script has the execution attribute
# chmod +x post-update
On your local computer, add the web server’s repository as a remote and name it "staging"
$ git remote add staging root@ubuntu-14:/srv/vhosts/staging.my-project.com/.git
You can confirm the new remote using:
$ git remote -v
Now you can edit your local files and perform the first push.
$ git push staging dev
This will add the "dev" branch on the repo. However, you need to checkout this new branch on the server, so the working directory shows the files. Go back to the server and checkout the new branch you just pushed and list the files in the project folder.
# git checkout dev
# ls -l
You can also confirm if the remote branch was updated by checking the commit log.
# git log --oneline
IMPORTANT NOTE: If the commit logs match on your local repo and the remote repo but the post-update hook is not being executed, it could be because the git daemon is not running. You could try rebooting the server to make sure the daemon starts.
Useful commands
Clean working directory
In case there are untracked files in the working directory and you want to remove them all at once, you can use the following command:
$ git clean -f
Note: This command will remove all untracked files under the current directory. If you need to remove all untracked files in the repo, you need to run it from the root directory of your repo.
Optionally, you can use the option -n to perform a dry run and show what files will be erased.
Undo ALL to specific commit
Note: git reset can be a dangerous command if you call it with --hard.
Undo all changes to commit a1b2c3d:
git reset --hard a1b2c3d
Revert a file to specific commit
git checkout abcde file/to/restore
Example: Revert htdocs/index.php to how it was in commit 34b95f00875:
$ git checkout 34b95f00875 htdocs/index.php
List the last N commits
git log -N --oneline
Ignore changes in tracked files
Useful for configuration files with different content on development/production.
Untrack:
git update-index --assume-unchanged /path/to/file
If you need to track again:
git update-index --no-assume-unchanged /path/to/file
Show changes on files
Show the differences between your working directory and the most recent commit:
$ git diff HEAD
Stashing your changes
Stashing is a great way to pause what you’re currently working on and come back to it later.
For example, if you working on that awesome, brand new feature but someone just found a bug that you need to fix. Add your changes to the index using:
$ git add .
Or add individual files to the index. Stash your changes away with:
$ git stash
And boom! You're back to your original working state. Got that bug fixed? Bring your work back with:
$ git stash apply
You can also do multiple layers of stashes, so make sure to use
$ git stash list
To check out all of your current ones. If you need to apply a stash from deeper in the stack, that’s easy too. Here’s how to apply the second stash you’ve got:
$ git stash apply stash@{1}
You can also easily apply the top stash on the stack by using:
$ git stash pop
A note with this command, it deletes that stash for good, while apply does not. You can manually delete stashes with:
$ git stash drop
Or delete all of the stored stashes with:
$ git stash clear
Rebasing
Useful to "catch" on a branch. An example could be:
- You need to add a feature to branch
dev, which is in commitC2. You checkout to a new branch calledfeature. - Then, someone else works on
devwith commitC3. - On your new branch, you create commit
C4.
You can apply the changes from C3 by rebasing:
$ git checkout feature
$ git rebase dev
Now you can merge into dev:
$ git checkout dev
$ git merge feature
Check merged branches
It is a good practice to remove any feature branch after merging on the main branch but before cleaning up your repo, you need to know what branches have been merged into your main branch. To do so, you can use the following command:
$ git branch --merged
This will show you the branches that have been merged on the current branch. Also, you can use the option --no-merged to list the branches that have not been merged into the current branch:
$ git branch --no-merged
It's safer to remove any branch when you know it's already on your main branch.
Untrack deleted remote branches
Sometimes, you delete branches on a remote repository but they still show in your local copy when you list all branches:
$ git branch -a
If you want to remove these ghost branches, run this:
$ git remote prune REMOTE_NAME
See changes in a file
$ git diff -- /file/path